Using the Windows execution environment

 Cloud Server v3.x Server v2.x
 The Windows execution environment provides the tools to build Windows projects, such as a Universal Windows Platform (UWP) application, a .NET executable, or Windows-specific (like the .NET framework) projects. The following specifications detail the capacities and included features of the Windows executor:
- Is VM-based to guarantee full job isolation.
- Can use either the Server Core version of Windows Server 2019 Datacenter Edition, or Windows Server 2022 Datacenter edition.
- Powershell is the default shell (Bash and cmd are available to be manually selected).
- Docker Engine - Enterprise is available for running Windows containers.
You can access the Windows execution environment by using the machine executor and specifying a Windows image.
To keep your configuration simple and to ensure you are using the most up-to-date image, you can instead use the Windows orb, and then specify the default executor from the orb in your job configuration. CircleCI strongly encourages using the Windows orb as it helps simplify your configuration.
Both options are shown in the example below. The configuration for CircleCI server is different because the Windows execution environment is managed by your server administrator.
version: 2.1 # Use version 2.1 to enable Orb usage.

orbs:
  win: circleci/windows@4.1.1 # The Windows orb give you everything you need to start using the Windows executor.

jobs:
  build: # name of your job
    executor: win/default # executor type

    steps:
      # Commands are run in a Windows virtual machine environment
      - checkout
      - run: Write-Host 'Hello, Windows'
version: 2

jobs:
  build: # name of your job
    resource_class: 'windows.medium'
    machine:
      image: 'windows-server-2022-gui:current'
      shell: 'powershell.exe -ExecutionPolicy Bypass'
    steps:
      # Commands are run in a Windows virtual machine environment
        - checkout
        - run: Write-Host 'Hello, Windows'
version: 2.1

jobs:
  build: # name of your job
    machine:
      image: windows-default
    steps:
      # Commands are run in a Windows virtual machine environment
        - checkout
        - run: Write-Host 'Hello, Windows'
version: 2

jobs:
  build: # name of your job
    machine:
      image: windows-default
    steps:
      # Commands are run in a Windows virtual machine environment
        - checkout
        - run: Write-Host 'Hello, Windows'
Note that in order to use a specific image with the Windows orb, for example, Windows Server 2022, it must be specified in the executor type, as shown in the following snippet:
version: 2.1

orbs:
  win: circleci/windows@4.1.1

jobs:
  build:
    executor: win/server-2022
    steps:
      - run: Write-Host 'Hello, Windows'
workflows:
  my-workflow:
    jobs:
      - build
Available resource classes
| Class | vCPUs | RAM | Disk Size |
|---|---|---|---|
| medium (default) | 4 | 15GB | 200 GB |
| large | 8 | 30GB | 200 GB |
| xlarge | 16 | 60GB | 200 GB |
| 2xlarge | 32 | 128GB | 200 GB |
version: 2.1 # Use version 2.1 to enable Orb usage.

orbs:
  win: circleci/windows@4.1.1 # The Windows orb give you everything you need to start using the Windows executor.

jobs:
  build: # name of your job
    executor:
      name: win/default # executor type
      size: medium # can be medium, large, xlarge, 2xlarge

    steps:
      # Commands are run in a Windows virtual machine environment
      - checkout
      - run: Write-Host 'Hello, Windows'
version: 2

jobs:
  build: # name of your job
    machine:
      image: 'windows-server-2022-gui:current'
    resource_class: windows.medium # can be medium, large, xlarge, 2xlarge
    steps:
      # Commands are run in a Windows virtual machine environment
        - checkout
        - run: Write-Host 'Hello, Windows'
version: 2.1

jobs:
  build: # name of your job
    machine:
      image: windows-default
    resource_class: windows.medium # can be medium, large, xlarge, 2xlarge
    steps:
      # Commands are run in a Windows virtual machine environment
        - checkout
        - run: Write-Host 'Hello, Windows'
version: 2

jobs:
  build: # name of your job
    machine:
      image: windows-default
    resource_class: windows.medium # can be medium, large, xlarge, 2xlarge
    steps:
      # Commands are run in a Windows virtual machine environment
        - checkout
        - run: Write-Host 'Hello, Windows'
Windows machine executor images
CircleCI supports Windows Server 2019 with Visual Studio 2019 and Windows Server 2022 with Visual Studio 2022. For information on what software is pre-installed on the Windows image, please visit the Developer Hub, or the Discuss forum. The Windows image page on the Developer Hub lists links to the most recent updates.
Details on the Windows Server 2022 image can be found on this Discuss post.
The Windows images are updated approximately every 30 days. If a tag is not specified when using the Windows image, by default the latest stable version will be applied. The tagging scheme for the Windows image is as follows:
- Current (formerly Stable): This image tag points to the latest production-ready Windows image. This image should be used by projects that want a decent level of stability, but would like to get occasional software updates. It is typically updated once a month.
The new current tag is available for Windows images. The current and stable tags are equivalent, and are currently both supported. Refer to the Discuss forum for more information.
-
Previous: This image tag points to the previous production-ready Windows image. This image can be used in cases where there was a breaking change in the latest software updates. It is typically updated once a month.
-
Edge: This image tag points to the latest version of the Windows image, and is built from the HEAD of the main branch. This tag is intended to be used as a testing version of the image with the most recent changes, and not guaranteed to be stable.
Specifying a shell with the Windows executor
There are three shells that you can use to run job steps on Windows:
- PowerShell (default in the Windows orb)
- Bash
- Command
You can configure the shell at the job level or at the step level. It is possible to use multiple shells in the same job. Consider the example below, where we use Bash, Powershell, and Command by adding a shell: argument to our job and step declarations:
version: 2.1

orbs:
  win: circleci/windows@4.1.1

jobs:
  build:
    executor:
      name: win/default
    steps:
      # default shell is Powershell
      - run:
         command: $(echo hello | Out-Host; $?) -and $(echo world | Out-Host; $?)
         shell: powershell.exe
      - run:
         command: echo hello && echo world
         shell: bash.exe
      - run:
         command: echo hello & echo world
         shell: cmd.exe
version: 2.1
jobs:
  build: # name of your job
    machine:
      image: windows-server-2019-vs2019:current # Windows machine image
    resource_class: windows.medium
    steps:
      # default shell is Powershell
      - run:
         command: $(echo hello | Out-Host; $?) -and $(echo world | Out-Host; $?)
         shell: powershell.exe
      - run:
         command: echo hello && echo world
         shell: bash.exe
      - run:
         command: echo hello & echo world
         shell: cmd.exe
version: 2
jobs:
  build: # name of your job
    machine:
      image: windows-server-2019-vs2019:current # Windows machine image
    resource_class: windows.medium
    steps:
      # default shell is Powershell
      - run:
         command: $(echo hello | Out-Host; $?) -and $(echo world | Out-Host; $?)
         shell: powershell.exe
      - run:
         command: echo hello && echo world
         shell: bash.exe
      - run:
         command: echo hello & echo world
         shell: cmd.exe
Note: It is possible to install updated or other Windows shell-tooling. For example, you could install the latest version of Powershell Core with the dotnet CLI and use it in a job’s successive steps:
version: 2.1

orbs:
  win: circleci/windows@4.1.1

jobs:
  build:
    executor: win/default
    steps:
      - checkout
      - run: dotnet tool install --global PowerShell
      - run: pwsh ./<my-script>.ps1
version: 2.1
jobs:
  build: # name of your job
    machine:
      image: windows-default # Windows machine image
    resource_class: windows.medium
    steps:
      - checkout
      - run: dotnet tool install --global PowerShell
      - run: pwsh ./<my-script>.ps1
version: 2
jobs:
  build: # name of your job
    machine:
      image: windows-default # Windows machine image
    resource_class: windows.medium
    steps:
      - checkout
      - run: dotnet tool install --global PowerShell
      - run: pwsh ./<my-script>.ps1
Running Windows Docker containers on the Windows executor
Please note that it is possible to run Windows Docker containers on the Windows executor like so:
version: 2.1

orbs:
  win: circleci/windows@4.1.1

jobs:
  build:
    executor:
      name: win/default
      shell: powershell.exe
    steps:
      - checkout
      - run: systeminfo
      - run:
          name: "Check docker"
          shell: powershell.exe
          command: |
            docker info
            docker run hello-world:nanoserver-1809
version: 2.1
jobs:
  build: # name of your job
    machine:
      image: windows-default # Windows machine image
    resource_class: windows.medium
    steps:
      - checkout
      - run: systeminfo
      - run:
          name: "Check docker"
          shell: powershell.exe
          command: |
            docker info
            docker run hello-world:nanoserver-1809
version: 2
jobs:
  build: # name of your job
    machine:
      image: windows-default # Windows machine image
    resource_class: windows.medium
    steps:
      - checkout
      - run: systeminfo
      - run:
          name: "Check docker"
          shell: powershell.exe
          command: |
            docker info
            docker run hello-world:nanoserver-1809
SSH into your Windows build
It is possible to SSH into a Windows build container. This is useful for troubleshooting problems in your pipeline. Follow these steps to SSH into a Windows container:
Steps
-
Ensure that you have added an SSH key to your GitHub or Bitbucket account.
-
To start a job with SSH enabled, select the ‘Rerun job with SSH’ option from the ‘Rerun Workflow’ dropdown menu.
-
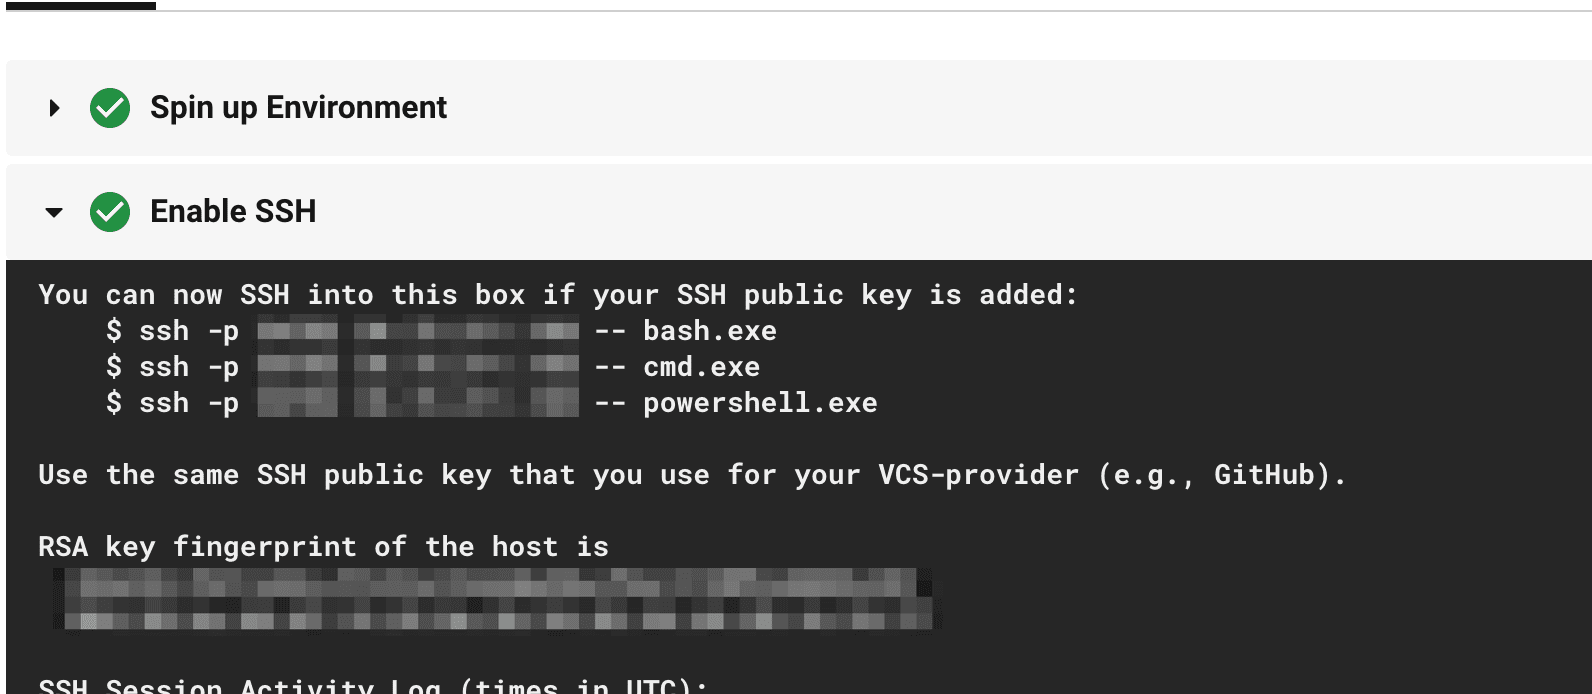
To see the connection details, expand the ‘Enable SSH’ section in the job output where you will see the SSH command needed to connect:

Ensure that you are passing the name of the shell you want to run when you SSH in. To run cmd.exe in the build above you would run: ssh -p <remote_ip> -- cmd.exe
The available options are:
- powershell.exe
- bash.exe
- cmd.exe
You can read more about using SSH in your builds here.
Known issues and limitations
These are the issues with the Windows executor that we are aware of and will address as soon as we can:
- Connecting to a Windows job via SSH and using the
bashshell results in an empty terminal prompt. - It is currently not possible to do nested virtualization (for example, using the
--platform linuxflag). - The Windows executor currently only supports Windows containers. Running Linux containers on Windows is not possible for now.
Next steps
Check out the Hello World on Windows page.
Help make this document better
This guide, as well as the rest of our docs, are open source and available on GitHub. We welcome your contributions.
- Suggest an edit to this page (please read the contributing guide first).
- To report a problem in the documentation, or to submit feedback and comments, please open an issue on GitHub.
- CircleCI is always seeking ways to improve your experience with our platform. If you would like to share feedback, please join our research community.
Need support?
Our support engineers are available to help with service issues, billing, or account related questions, and can help troubleshoot build configurations. Contact our support engineers by opening a ticket.
You can also visit our support site to find support articles, community forums, and training resources.

CircleCI Documentation by CircleCI is licensed under a Creative Commons Attribution-NonCommercial-ShareAlike 4.0 International License.


