Introduction to Nomad Cluster Operation

 Server v3.x Server Admin
 CircleCI uses Nomad as the primary job scheduler. This section provides a basic introduction to Nomad for understanding how to operate the Nomad Cluster in your CircleCI installation.
Basic Terminology and Architecture

-
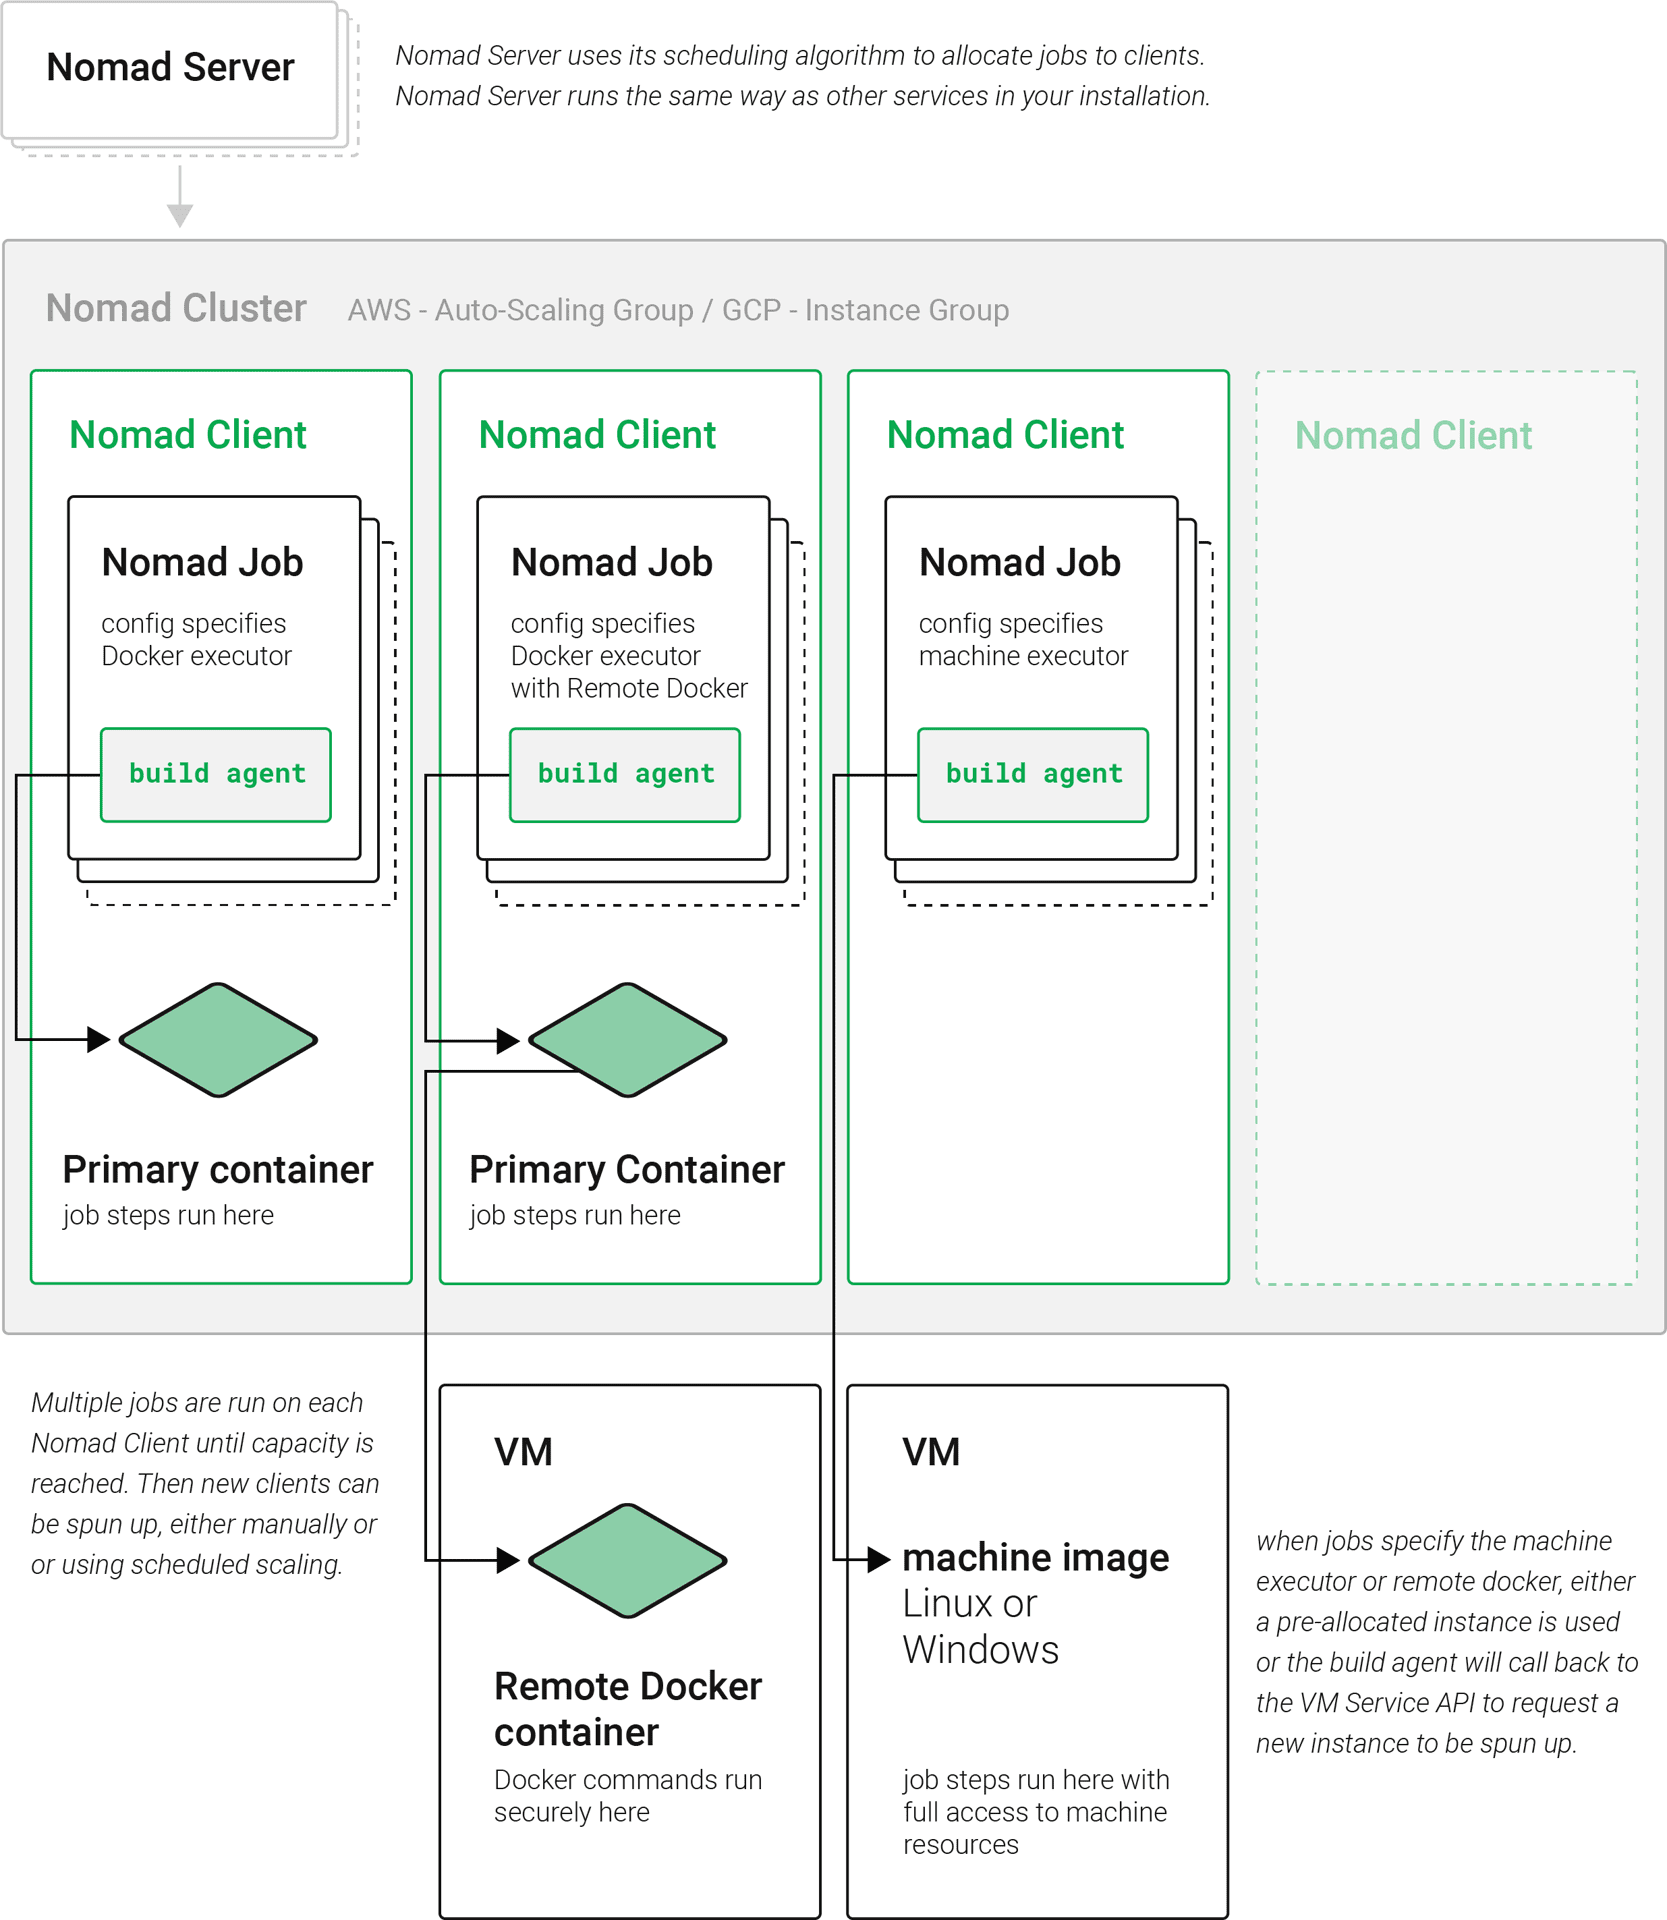
Nomad server: Nomad servers are the brains of the cluster, they receive and allocate jobs to Nomad clients. In CircleCI server, a Nomad server runs as a service in your Kubernetes cluster.
-
Nomad client: Nomad clients execute the jobs they are allocated by Nomad servers. Usually a Nomad client runs on a dedicated machine (often a VM) to take full advantage of machine power. You can have multiple Nomad clients to form a cluster and the Nomad server allocates jobs to the cluster with its scheduling algorithm.
-
Nomad jobs: A Nomad job is a specification, provided by a user, that declares a workload for Nomad. A Nomad job corresponds to an execution of a CircleCI job. If the job uses parallelism, for example 10 parallelism, then Nomad runs 10 jobs.
-
Build agent: Build agent is a Go program written by CircleCI that executes steps in a job and reports the results. Build agent is executed as the main process inside a Nomad job.
Basic operations
The following section is a basic guide to operating a Nomad cluster in your installation.
The nomad CLI is installed in the Nomad pod. It is preconfigured to talk to the Nomad cluster, so it is possible to use kubectl along with the nomad command to run the commands in this section.
Checking the jobs status
The get a list of statuses for all jobs in your cluster, run the following command:
kubectl exec -it nomad-server-pod-ID -- nomad statusThe Status is the most important field in the output, with the following status type definitions:
-
running: Nomad has started executing the job. This typically means your job in CircleCI is started. -
pending: There are not enough resources available to execute the job inside the cluster. -
dead: Nomad has finished executing the job. The status becomesdeadregardless of whether the corresponding CircleCI job/build succeeds or fails.
Checking the cluster status
To get a list of your Nomad clients, run the following command:
kubectl exec -it nomad-server-pod-ID -- nomad node-status nomad node-status reports both Nomad clients that are currently serving (status active) and Nomad clients that were taken out of the cluster (status down). Therefore, you need to count the number of active Nomad clients to know the current capacity of your cluster. |
To get more information about a specific client, run the following command from that client:
kubectl exec -it nomad-server-pod-ID -- nomad node-status -selfThis gives information such as how many jobs are running on the client and the resource utilization of the client.
Checking logs
As noted in the Nomad jobs section above, a Nomad job corresponds to an execution of a CircleCI job. Therefore, Nomad job logs can sometimes help to understand the status of a CircleCI job if there is a problem. To get logs for a specific job, run the following command:
kubectl exec -it nomad-server-pod-ID -- nomad logs -job -stderr <nomad-job-id> Be sure to specify the -stderr flag, as this is where most Build Agent logs appear. |
While the nomad logs -job command is useful, the command is not always accurate because the -job flag uses a random allocation of the specified job. The term allocation is a smaller unit in Nomad Job, which is beyond the scope of this document. To learn more, please see the official document.
Complete the following steps to get logs from the allocation of the specified job:
-
Get the job ID with
nomad statuscommand. -
Get the allocation ID of the job with
nomad status <job-id>command. -
Get the logs from the allocation with
nomad logs -stderr <allocation-id>
Shutting down a Nomad client
When you want to shutdown a Nomad client, you must first set the client to drain mode. In drain mode, the client will finish any jobs that have already been allocated but will not be allocated any new jobs.
-
To drain a client, log in to the client and set the client to drain mode with
node-draincommand as follows:nomad node-drain -self -enable -
Then, make sure the client is in drain mode using the
node-statuscommand:nomad node-status -self
Alternatively, you can drain a remote node with the following command, substituting the node ID:
nomad node-drain -enable -yes <node-id>Scaling down the client cluster
To set up a mechanism for clients to shutdown, first enter drain mode, then wait for all jobs to be finished before terminating the client. You can also configure an ASG Lifecycle Hook that triggers a script for scaling down instances.
The script should use the commands in the section above to do the following:
-
Put the instance in drain mode.
-
Monitor running jobs on the instance and wait for them to finish.
-
Terminate the instance.
Help make this document better
This guide, as well as the rest of our docs, are open source and available on GitHub. We welcome your contributions.
- Suggest an edit to this page (please read the contributing guide first).
- To report a problem in the documentation, or to submit feedback and comments, please open an issue on GitHub.
- CircleCI is always seeking ways to improve your experience with our platform. If you would like to share feedback, please join our research community.
Need support?
Our support engineers are available to help with service issues, billing, or account related questions, and can help troubleshoot build configurations. Contact our support engineers by opening a ticket.
You can also visit our support site to find support articles, community forums, and training resources.

CircleCI Documentation by CircleCI is licensed under a Creative Commons Attribution-NonCommercial-ShareAlike 4.0 International License.


