Using the Slack orb to set up Slack notifications

 Cloud Server v3.x Server v2.x
 This guide gets you started with the CircleCI Slack orb.
Introduction
Orbs are open source, shareable packages of reusable configuration elements. They help you reduce complexity, integrate your software with third-party apps, and save time.
One of CircleCI’s most popular orbs is Slack. The Slack orb allows you to implement event-based notifications across all your CI/CD pipelines. Using either built-in message templates or Slack’s visual Block Kit Builder, you can create and customize notifications specific to your organization’s needs.
In this tutorial, you will learn how to:
-
Create a
config.ymlfile using the Slack orb. -
Store your Slack credentials securely in a context.
-
Use templates to create alerts for successful and failed builds.
-
Alert specific channels, teams, or people.
-
Access the Slack Block Kit Builder to create your own customized alerts.
To follow this tutorial, you need:
-
A CircleCI account - if you do not have an account, you can sign up for free.
-
A Version Control System (VCS), such as GitHub or BitBucket.
-
A Slack workspace (you can create your own for testing purposes, if you do not want to use your company workspace).
Step one - Create your config.yml file
If you have not already done so, create a .circleci folder at the root of your repo. Inside the .circleci folder, create a config.yml file.
Copy and paste the sample code below into your config.yml file:
version: 2.1
orbs:
  slack: circleci/slack@4.9.3
jobs:
  notify:
    docker:
      - image: 'cimg/base:stable'
    steps:
      - slack/notify:
          custom: |
            {
              "blocks": [
                {
                  "type": "section",
                  "fields": [
                    {
                      "type": "plain_text",
                      "text": "*This is a text notification*",
                      "emoji": true
                    }
                  ]
                }
              ]
            }
          event: always
workflows:
  send-notification:
    jobs:
      - notify:
          context: slack-secrets
The following commentary describes what occurs in the main elements of the sample code:
-
Line 1: This indicates the config version you are using.
2.1is the most recent version. -
Lines 2-3: This is the orbs stanza. You are using the
slack: circleci/slack@4.9.3orb. -
Lines 5-7: This is a job called notify, which is executed in a basic Docker container.
-
Lines 8-9: This is a step which must be called slack/notify to work with the Slack orb.
-
Lines 10-24: This custom block includes a basic notification from the Slack Block Kit Builder. As you can see, it is in JSON format. In Part 3, you will use more sophisticated templates.
-
Line 25: The
event: alwaysparameter means this notification is triggered for all event types. In Part 3, you will use different notifications for different events. -
Line 30: This references a CircleCI context where you will save your Slack credentials in Step 2.
Now you have a basic config.yml file set up, you can connect CircleCI with Slack.
If you commit your config.yml file at this point and trigger a pipeline, your build will fail. This is because you need to add your Slack credentials in the next step. |
Step two - Connect CircleCI with Slack
In this step, you will:
-
Obtain an API token from Slack.
-
Create a context to store those credentials in CircleCI.
-
Trigger the pipeline so you receive a notification.
Authenticating your application
The Slack orb is an application that executes as part of your job on CircleCI. Before you can receive notifications, you need to authenticate your application.
Creating a Slack app
-
Visit Your Apps on the Slack API website and click the green Create an App button.
-
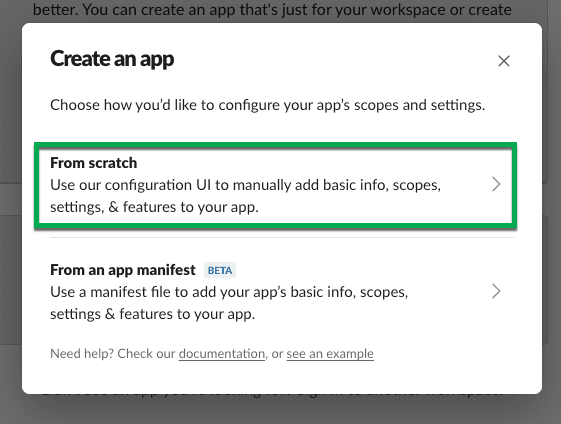
Choose From scratch.
-
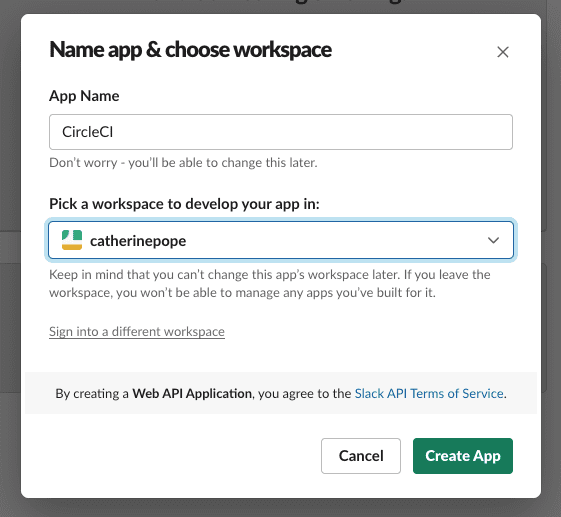
Give your app a name, for example, CircleCI, and select the Slack workspace in which you want to use it. You cannot change this workspace afterwards.
-
Click the green Create App button.
Setting your app permissions
-
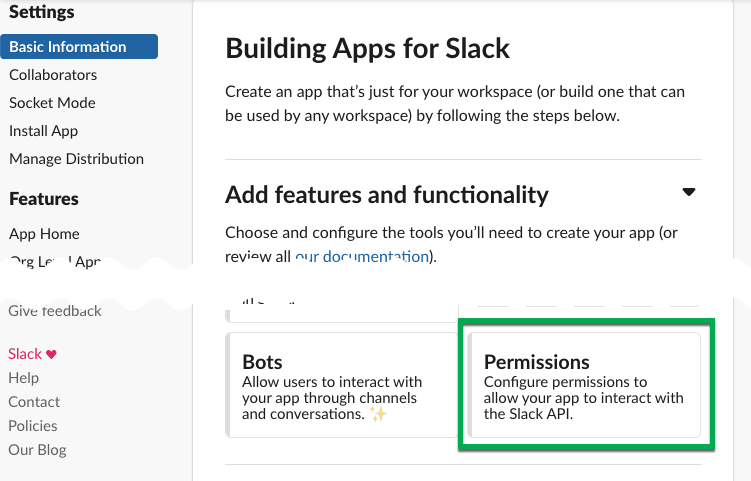
On the Basic Information page, locate the Permissions tile under Add features and functionality.
-
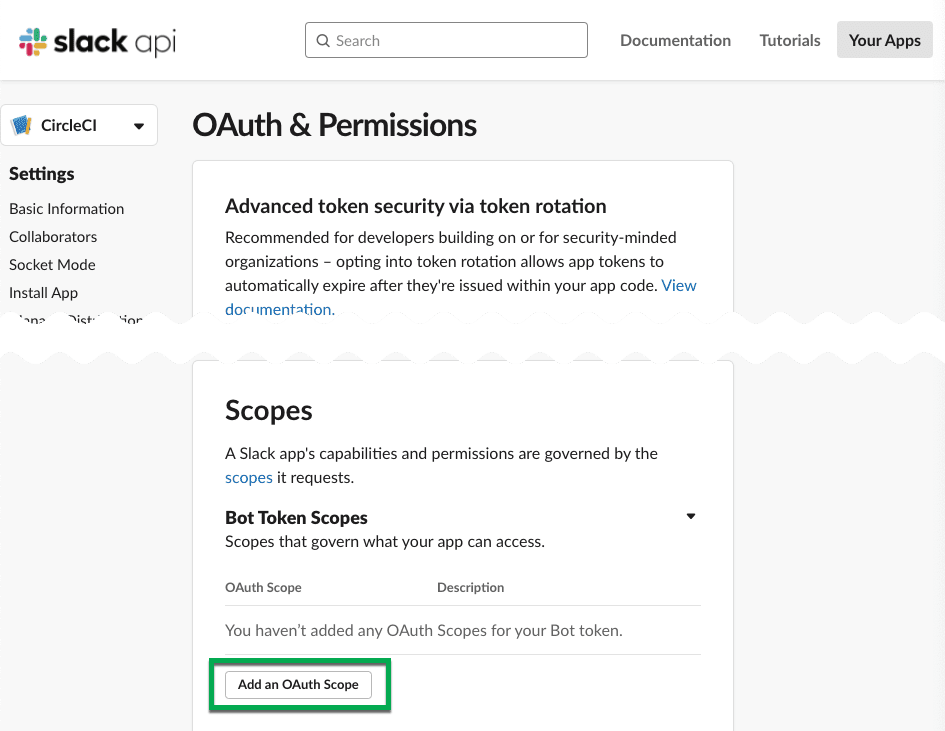
On the OAuth & Permissions page, scroll down to Scopes. This is where you need to create the permissions for your Slack app.
-
Under Bot Token Scopes, click Add an OAuth Scope.
-
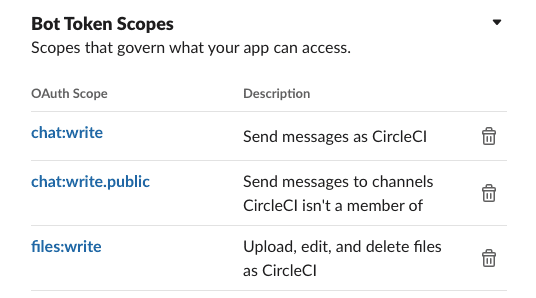
The Slack orb needs permission to post chat messages and upload files, so create the following scopes:
-
chat:write
-
chat:write.public
-
files:write
-
| To receive Slack notifications in a private channel, you need to add your Slack app to that channel. Open the channel, click the photos of the channel members in the top right-hand corner, then click the Integrations tab. From here, you can add an app. |
Installing your app
-
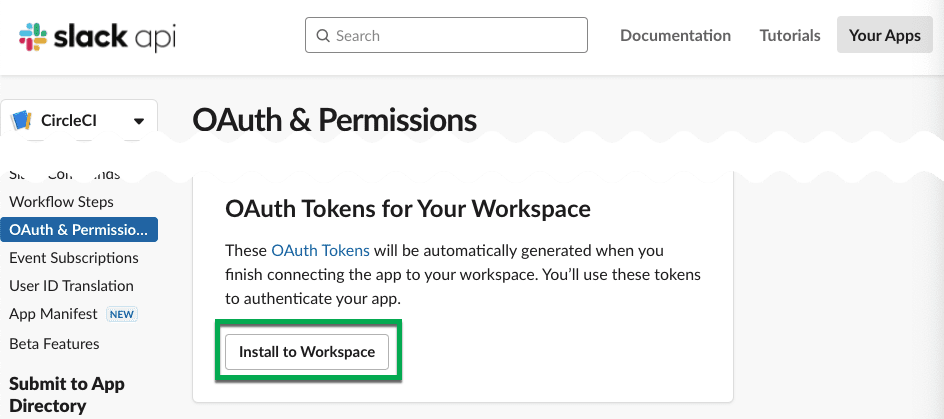
Once you have created your scopes, scroll up to the top of the page and click the Install to Workspace button.
-
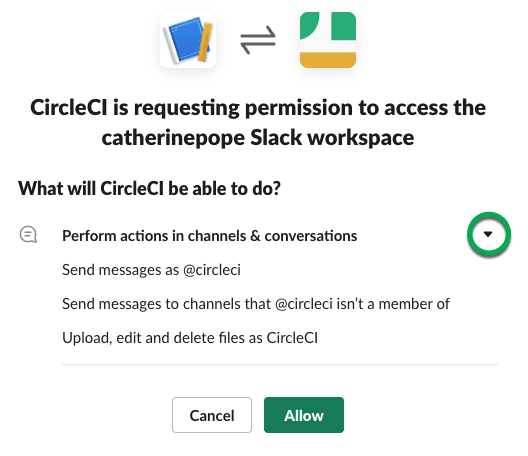
You will then be asked to grant permission for the app to access your Slack workspace.
-
Click the disclosure triangle to double-check the permissions, then click the green Allow button.
-
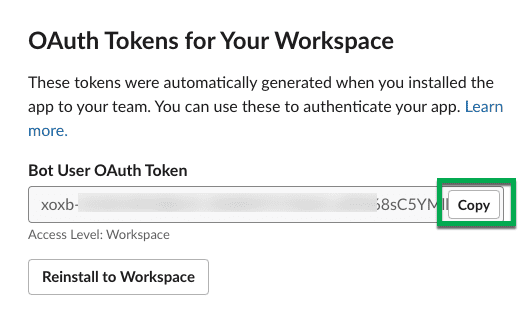
You should see a Bot User OAuth Token. Copy this token to your clipboard, ready to add it to CircleCI. Make sure you keep this private.
Creating a context
In CircleCI, contexts allow you to secure and share environment variables across projects. Once you have created a context with your Slack credentials, you and your colleagues will be able to reuse them.
In CircleCI:
-
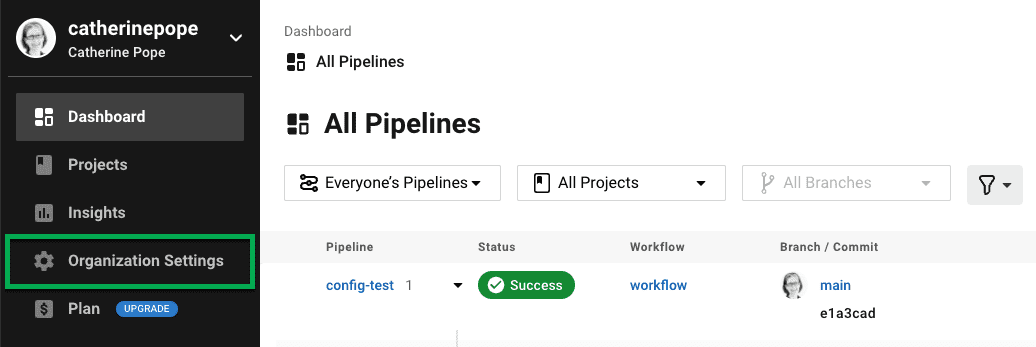
Click the Organization Settings page.
-
Under Context, click the blue Create Context button and add a unique name, such as slack-secrets (that is the name specified in the
config.ymlfile above).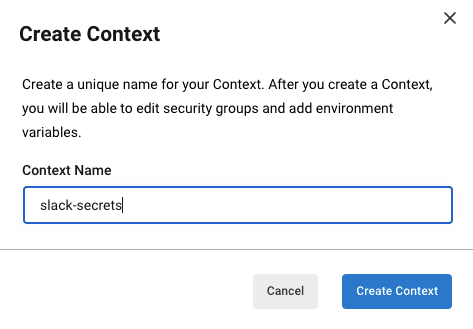
-
Click the blue Create Context button.
-
Click the name of the context you just created.
-
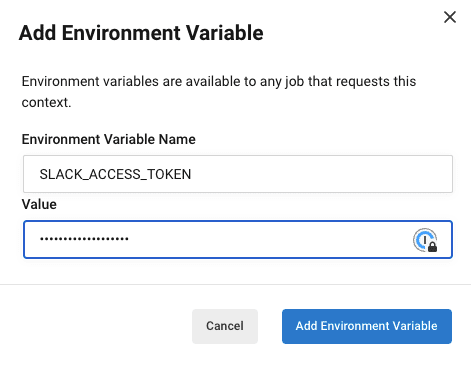
Click the blue Add Environment Variable button and enter your first key value pair.
-
The Environment Variable Name is
SLACK_ACCESS_TOKEN. -
The value is your Slack Bot User OAuth Access Token.
-
-
Click the Add Environment Variable button to save it.
-
Click the blue Add Environment Variable button again.
-
The Environment Variable Name is
SLACK_DEFAULT_CHANNEL. -
The value is the ID of the default Slack channel for posting your notifications. You can override this setting in your individual jobs.
-
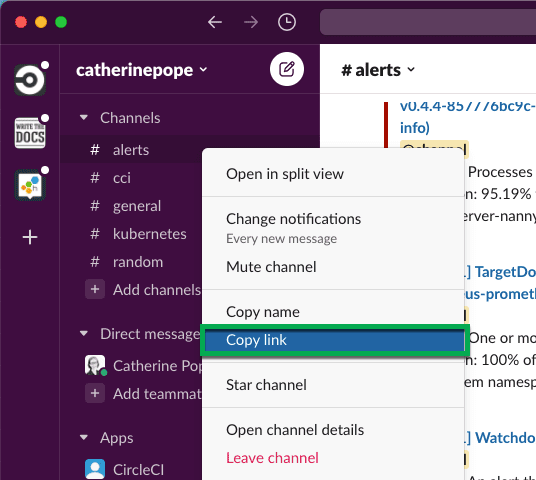
| To get the ID for your Slack channel, right-click the channel in Slack and choose Copy Link. The ID will be visible at the end of the URL and will be in this format: C034R26AM36. |
Make sure you have included the slack-secrets context in your notify job and that the name matches what you created:
workflows:
  send-notification:
    jobs:
      - notify:
          context: slack-secrets
You can now reuse this context in other jobs and projects.
Commit your config.yml file (and push it, if you are working remotely).
Triggering an alert
In the CircleCI dashboard:
-
Click Projects.
-
Find the repo and click the blue Set Up Project button next to it.

-
Choose the branch on which you committed your
config.ymlfile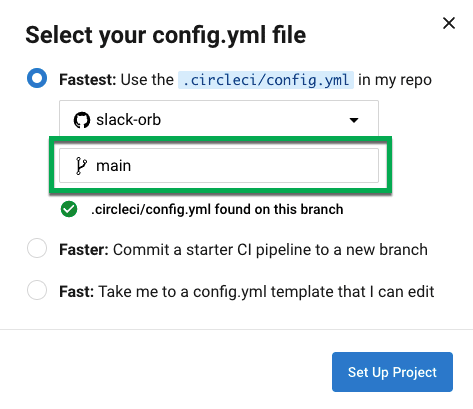
-
Click the blue Set Up Project button.
This triggers your CircleCI pipeline, which contains a Slack orb with your credentials.
You should then see a green Success badge and a green tick next to your notify job.

Click on your job to see what just happened. You should see the message body that was sent to Slack.
Now open your Slack workspace. In the default channel you specified earlier, you should see the alert triggered by your CircleCI pipeline.
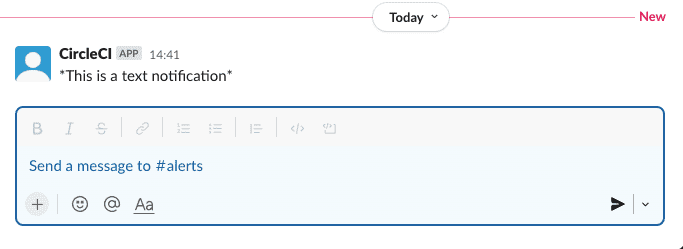
Although this is a basic alert, you have achieved a lot already:
-
Created a
.circleci/config.ymlfile with the Slack orb. -
Created a context to store your Slack-related environment variables.
-
Created a Slack app.
Step three - Use message templates
The Slack orb includes several notification templates you can use to notify your channel of various CircleCI events:
-
basic_success_1- for pass events where the job succeeded. -
basic_fail_1- for_fail_ events, where the job failed. -
success_tagged_deploy_1- for successful deployments. -
basic_on_hold_1- for on-hold jobs that are awaiting approval.
To use these templates in your job, include the event and template parameters under steps in the config.yml file. For example:
jobs:
  notify:
    docker:
      - image: 'cimg/base:stable'
    steps:
- slack/notify:
	  event: fail
	  template: basic_fail_1
- slack/notify:
	  event: pass
template: success_tagged_deploy_1-
Line 7 specifies that the template on the next line is used for failed events.
-
Line 8 specifies the template to be used, in this case
basic_fail_1. -
Line 9 specifies that the template on the next line is used for pass events.
-
Line 10 specifies the template to be used, in this case
basic_success_1.
Whereas in Step 1 you used an all-purpose alert, now you have included different steps according to whether the job has passed or failed. The Slack orb triggers the appropriate step.
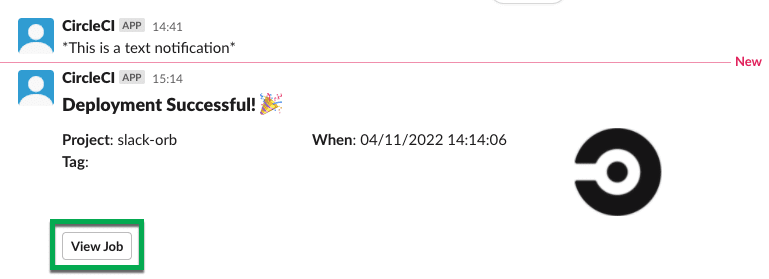
Commit your updated config.yml file (and push it, if you are working remotely). Once the pipeline is complete, you should see a more sophisticated alert in your Slack channel.
Including additional parameters
You can also include a mention for a failed job, to alert a specific person or team:
- slack/notify:
	event: fail
	mentions: '@EngineeringTeam'
	template: basic_fail_1
To notify multiple channels, place the IDs in quotes and separate them with a comma:
- slack/notify:
    channel: 'ABCXYZ, ZXCBN'
    event: fail
    template: basic_fail_1
To restrict your alert to a specific branch, add a branch_pattern parameter:
 - slack/notify:
      branch_pattern: main
      event: fail
      template: basic_fail_1
This is useful if you do not want to receive alerts for feature branches.
Using the Slack Block Kit Builder
If you would like to further customize your notifications, you can use the Slack Block Kit Builder. This framework allows you to create sophisticated notifications, using images, form fields, and other interactive elements.
Once you have created your block (which is a JSON object), copy and paste it into your config.yml file within the custom parameter:
- slack/notify:
    event: always
    custom: | # your custom notification goes here
      {
        "blocks": [
          {
            "type": "section",
            "fields": [
              {
                "type": "plain_text",
                "text": "*This is a text notification*",
                "emoji": true
              }
            ]
          }
        ]
      }
Conclusion
In this tutorial, you have configured the Slack orb to send CircleCI notifications to your Slack channel. You created a basic notification, built and authenticated your Slack app, and used templates.
For further configuration options, take a look at the Slack orb documentation. You can also find many more orbs in the Orb Registry.
Help make this document better
This guide, as well as the rest of our docs, are open source and available on GitHub. We welcome your contributions.
- Suggest an edit to this page (please read the contributing guide first).
- To report a problem in the documentation, or to submit feedback and comments, please open an issue on GitHub.
- CircleCI is always seeking ways to improve your experience with our platform. If you would like to share feedback, please join our research community.
Need support?
Our support engineers are available to help with service issues, billing, or account related questions, and can help troubleshoot build configurations. Contact our support engineers by opening a ticket.
You can also visit our support site to find support articles, community forums, and training resources.

CircleCI Documentation by CircleCI is licensed under a Creative Commons Attribution-NonCommercial-ShareAlike 4.0 International License.


