CircleCI Server v3.x Installation Phase 2

 Server v3.x Server Admin
 Before you begin with the CircleCI server v3.x core services installation phase, ensure all prerequisites are met.
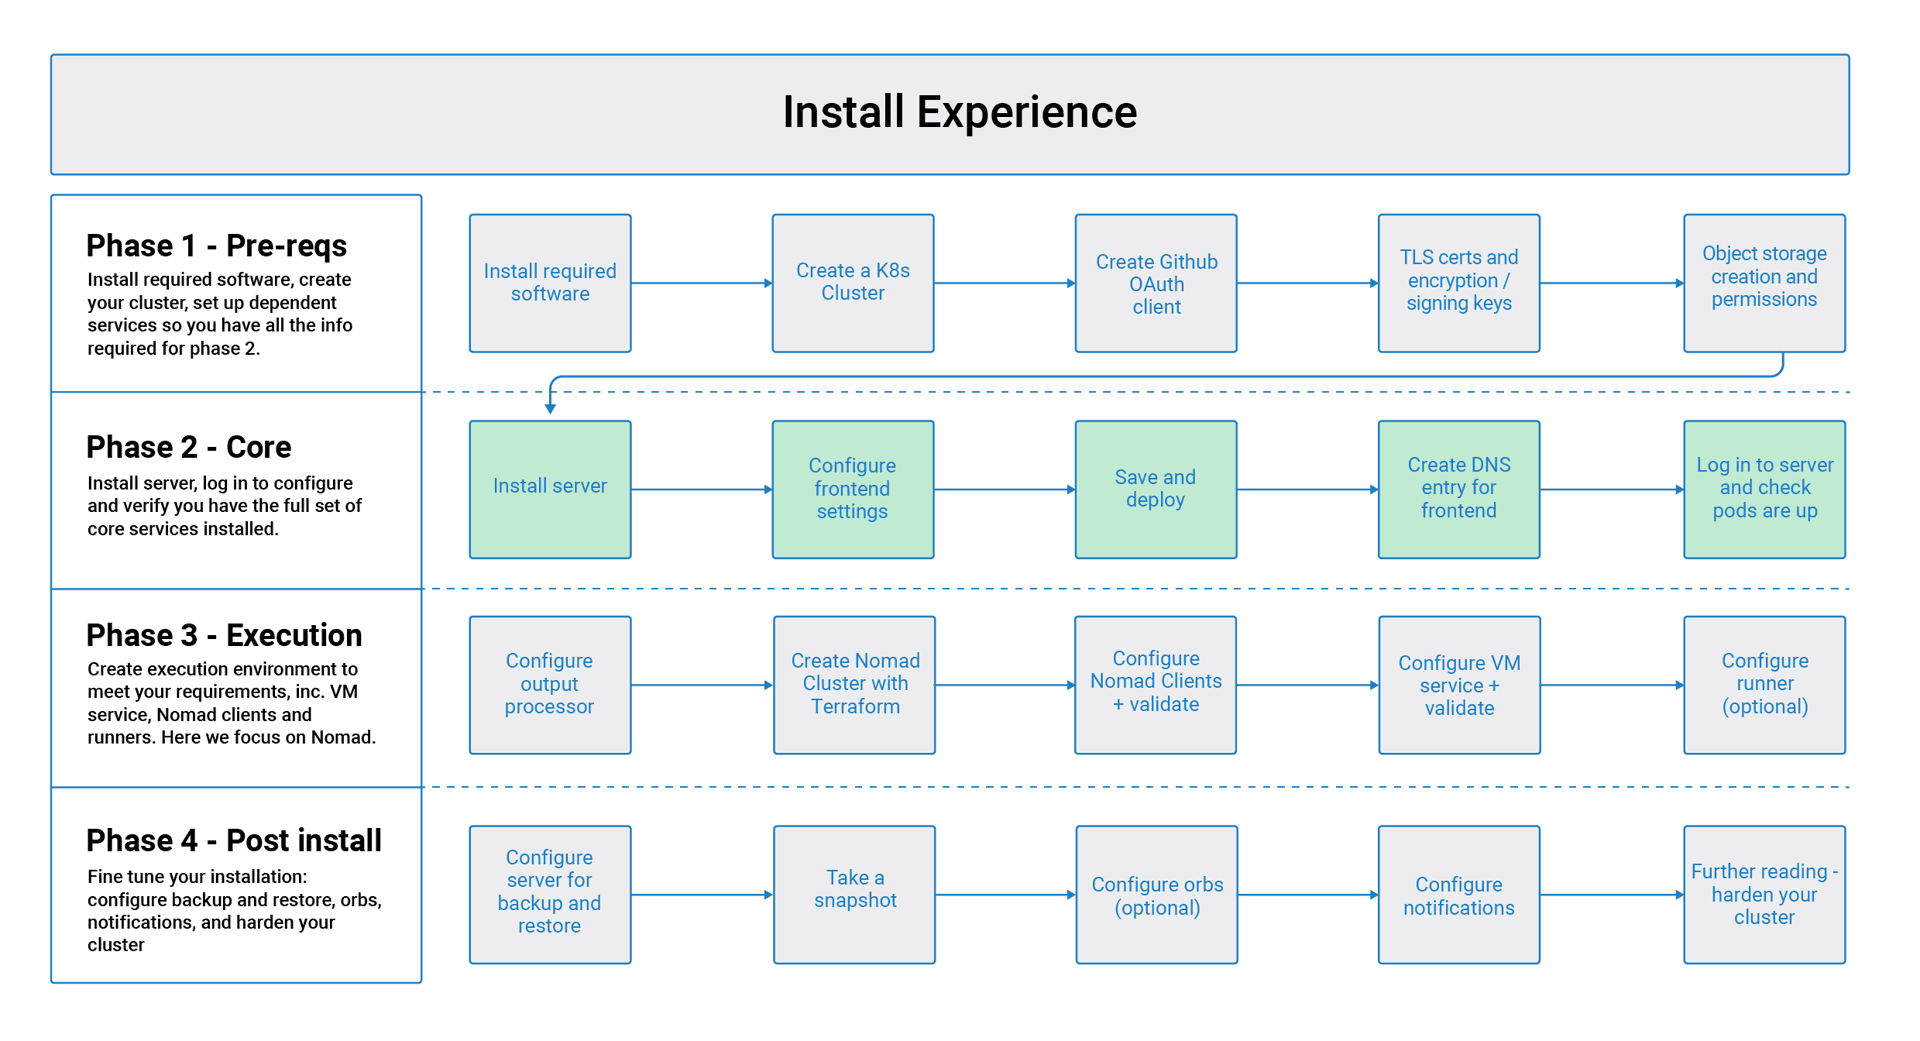
In the following sections replace any items or credentials displayed between < > with your details. |
Phase 2: Core services installation
CircleCI server v3.x uses KOTS from Replicated for installation management and distribution.
-
Ensure you are running the minimum KOTS version (1.65.0) by running the command:
kubectl kots versionThe KOTS command opens up a tunnel to the admin console. If running on Windows inside WSL2, the port is not available on the host machine. Turning WSL off and back on should resolve the issue. For more information, please see https://github.com/microsoft/WSL/issues/4199. -
From the terminal, run (if you are installing behind a proxy see Installing behind HTTP Proxy):
kubectl kots install circleci-serverYou will be prompted for:
-
namespace for the deployment
-
password for the KOTS Admin Console
-
-
When complete, you should be provided with a URL to access the KOTS admin console, usually
http://localhost:8800.
If you need to get back to the KOTS admin console at a later date, run: kubectl kots admin-console -n <YOUR_CIRCLECI_NAMESPACE> |
Once you have created your namespace, we recommend setting your kubectl context too with the following command: kubectl config set-context --current --namespace <namespace> |
Installing behind an HTTP Proxy (optional)
If you wish to install CircleCI server behind a proxy, use the following command structure should be used for step 2 above (for more information see the KOTS docs here):
kubectl kots install circleci-server --http-proxy <YOUR_HTTP_PROXY_URI> --https-proxy <https-proxy> --no-proxy <YOUR_NO_PROXY_LIST>The load balancer endpoints must be added to the no-proxy list for the following services: output processor and vm-service. This is because the no-proxy list is shared between the application and build-agent. The application and build-agent are assumed to be behind the same firewall and therefore cannot have a proxy between them.
For further information see the Configuring a Proxy guide.
Frontend Settings
Frontend settings control the web-application-specific aspects of the CircleCI system.
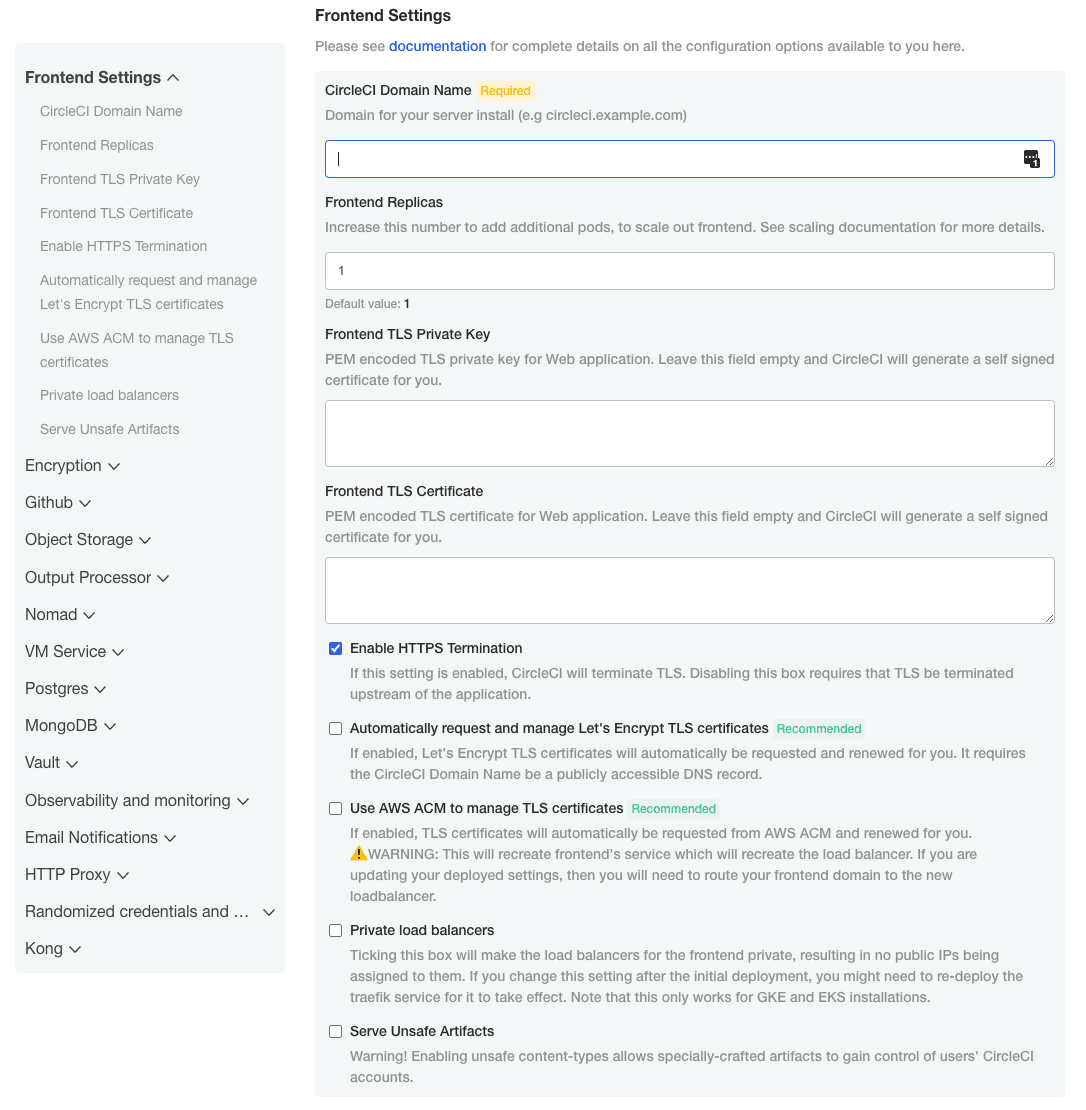
Complete the fields described below.
-
CircleCI Domain Name (required) - Enter the domain name you specified when creating your Frontend TLS key and certificate.
-
Frontend Replicas - Used to increase the amount of traffic that can be handled by the frontend.
-
Frontend TLS Private Key (required) - You created this during your prerequisite steps. You can retrieve this value with the following command:
cat /etc/letsencrypt/live/<CIRCLECI_SERVER_DOMAIN>/privkey.pem -
Frontend TLS Certificate (required) - You created this during your prerequisite steps. You can retrieve this value with the following command:
cat /etc/letsencrypt/live/<CIRCLECI_SERVER_DOMAIN>/fullchain.pem
-
Private Load Balancer (optional) - Load balancer does not generate external IP addresses.
If you are selecting the option to use private load balancers, the Let’s Encrypt option will no longer work and become unavailable.
Encryption
Encryption and artifact signing keys were created during prerequisites phase. You can enter them here now.
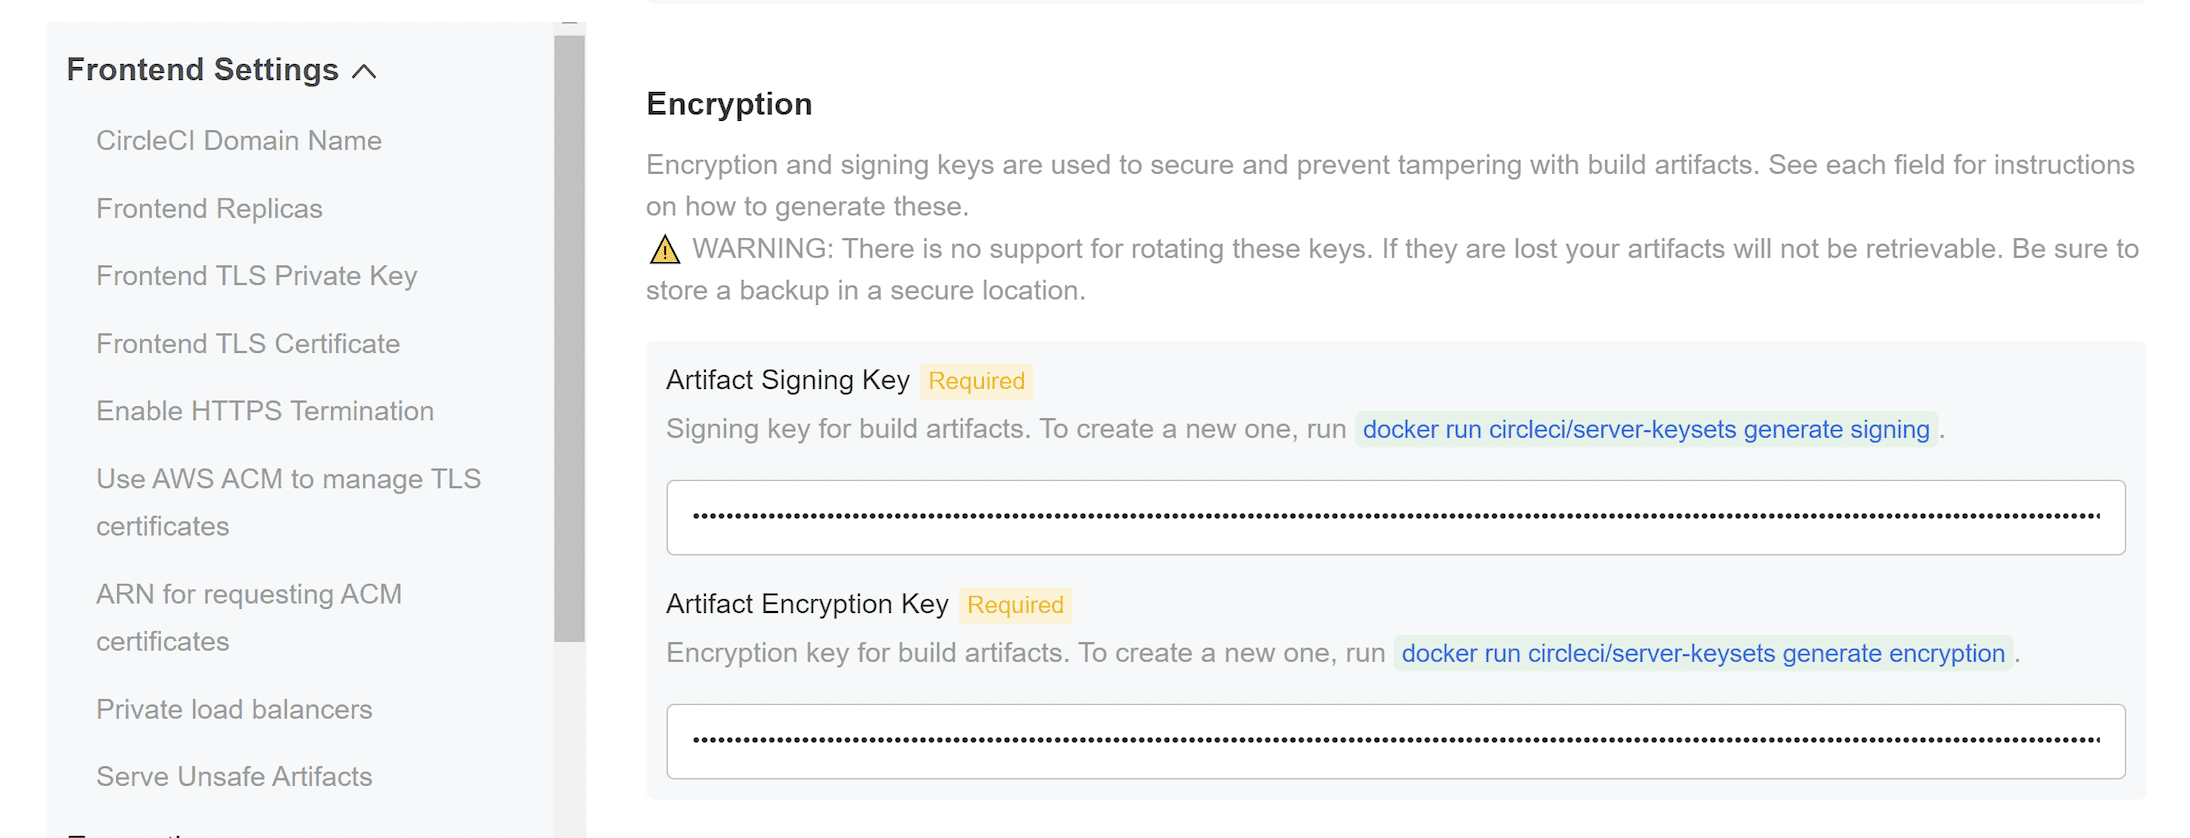
Complete the following fields:
-
Artifact Signing Key (required)
-
Encryption Signing Key (required)
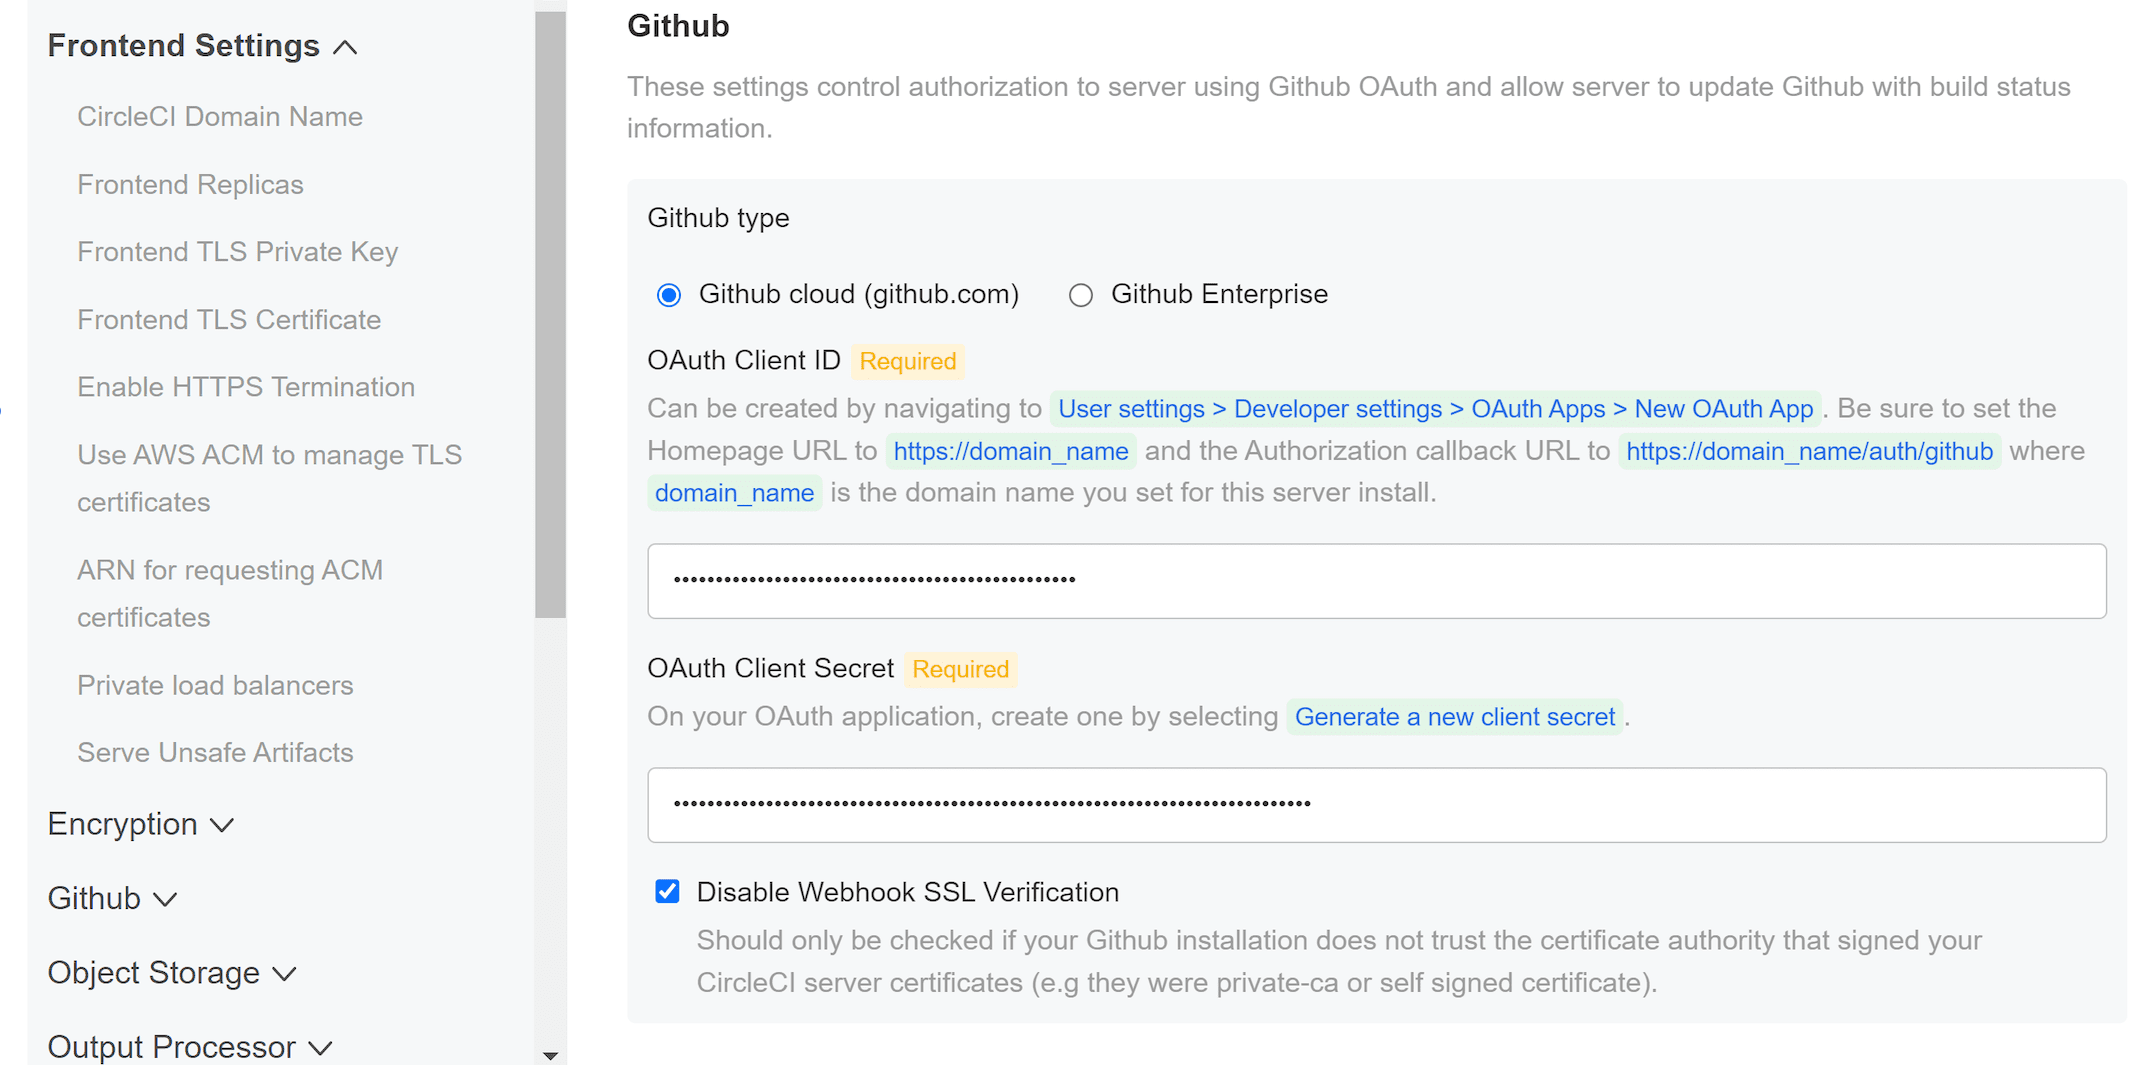
GitHub
You created your Github OAuth application in the prerequisite phase. Use the data to complete the following settings:
-
GitHub Type (required) - Select Cloud or Enterprise (on premises).
-
OAuth Client ID (required) - The OAuth Client ID provided by GitHub.
-
OAuth Client Secret (required) - The OAuth Client Secret provided by GitHub.
-
Github Enterprise Fingerprint - Required when using a proxy. Include the output of
ssh-keyscan github.example.comin the text field.
Object storage
You created your Object Storage Bucket and Keys in the prerequisite steps. Use the data to complete the following settings depending on your platform.
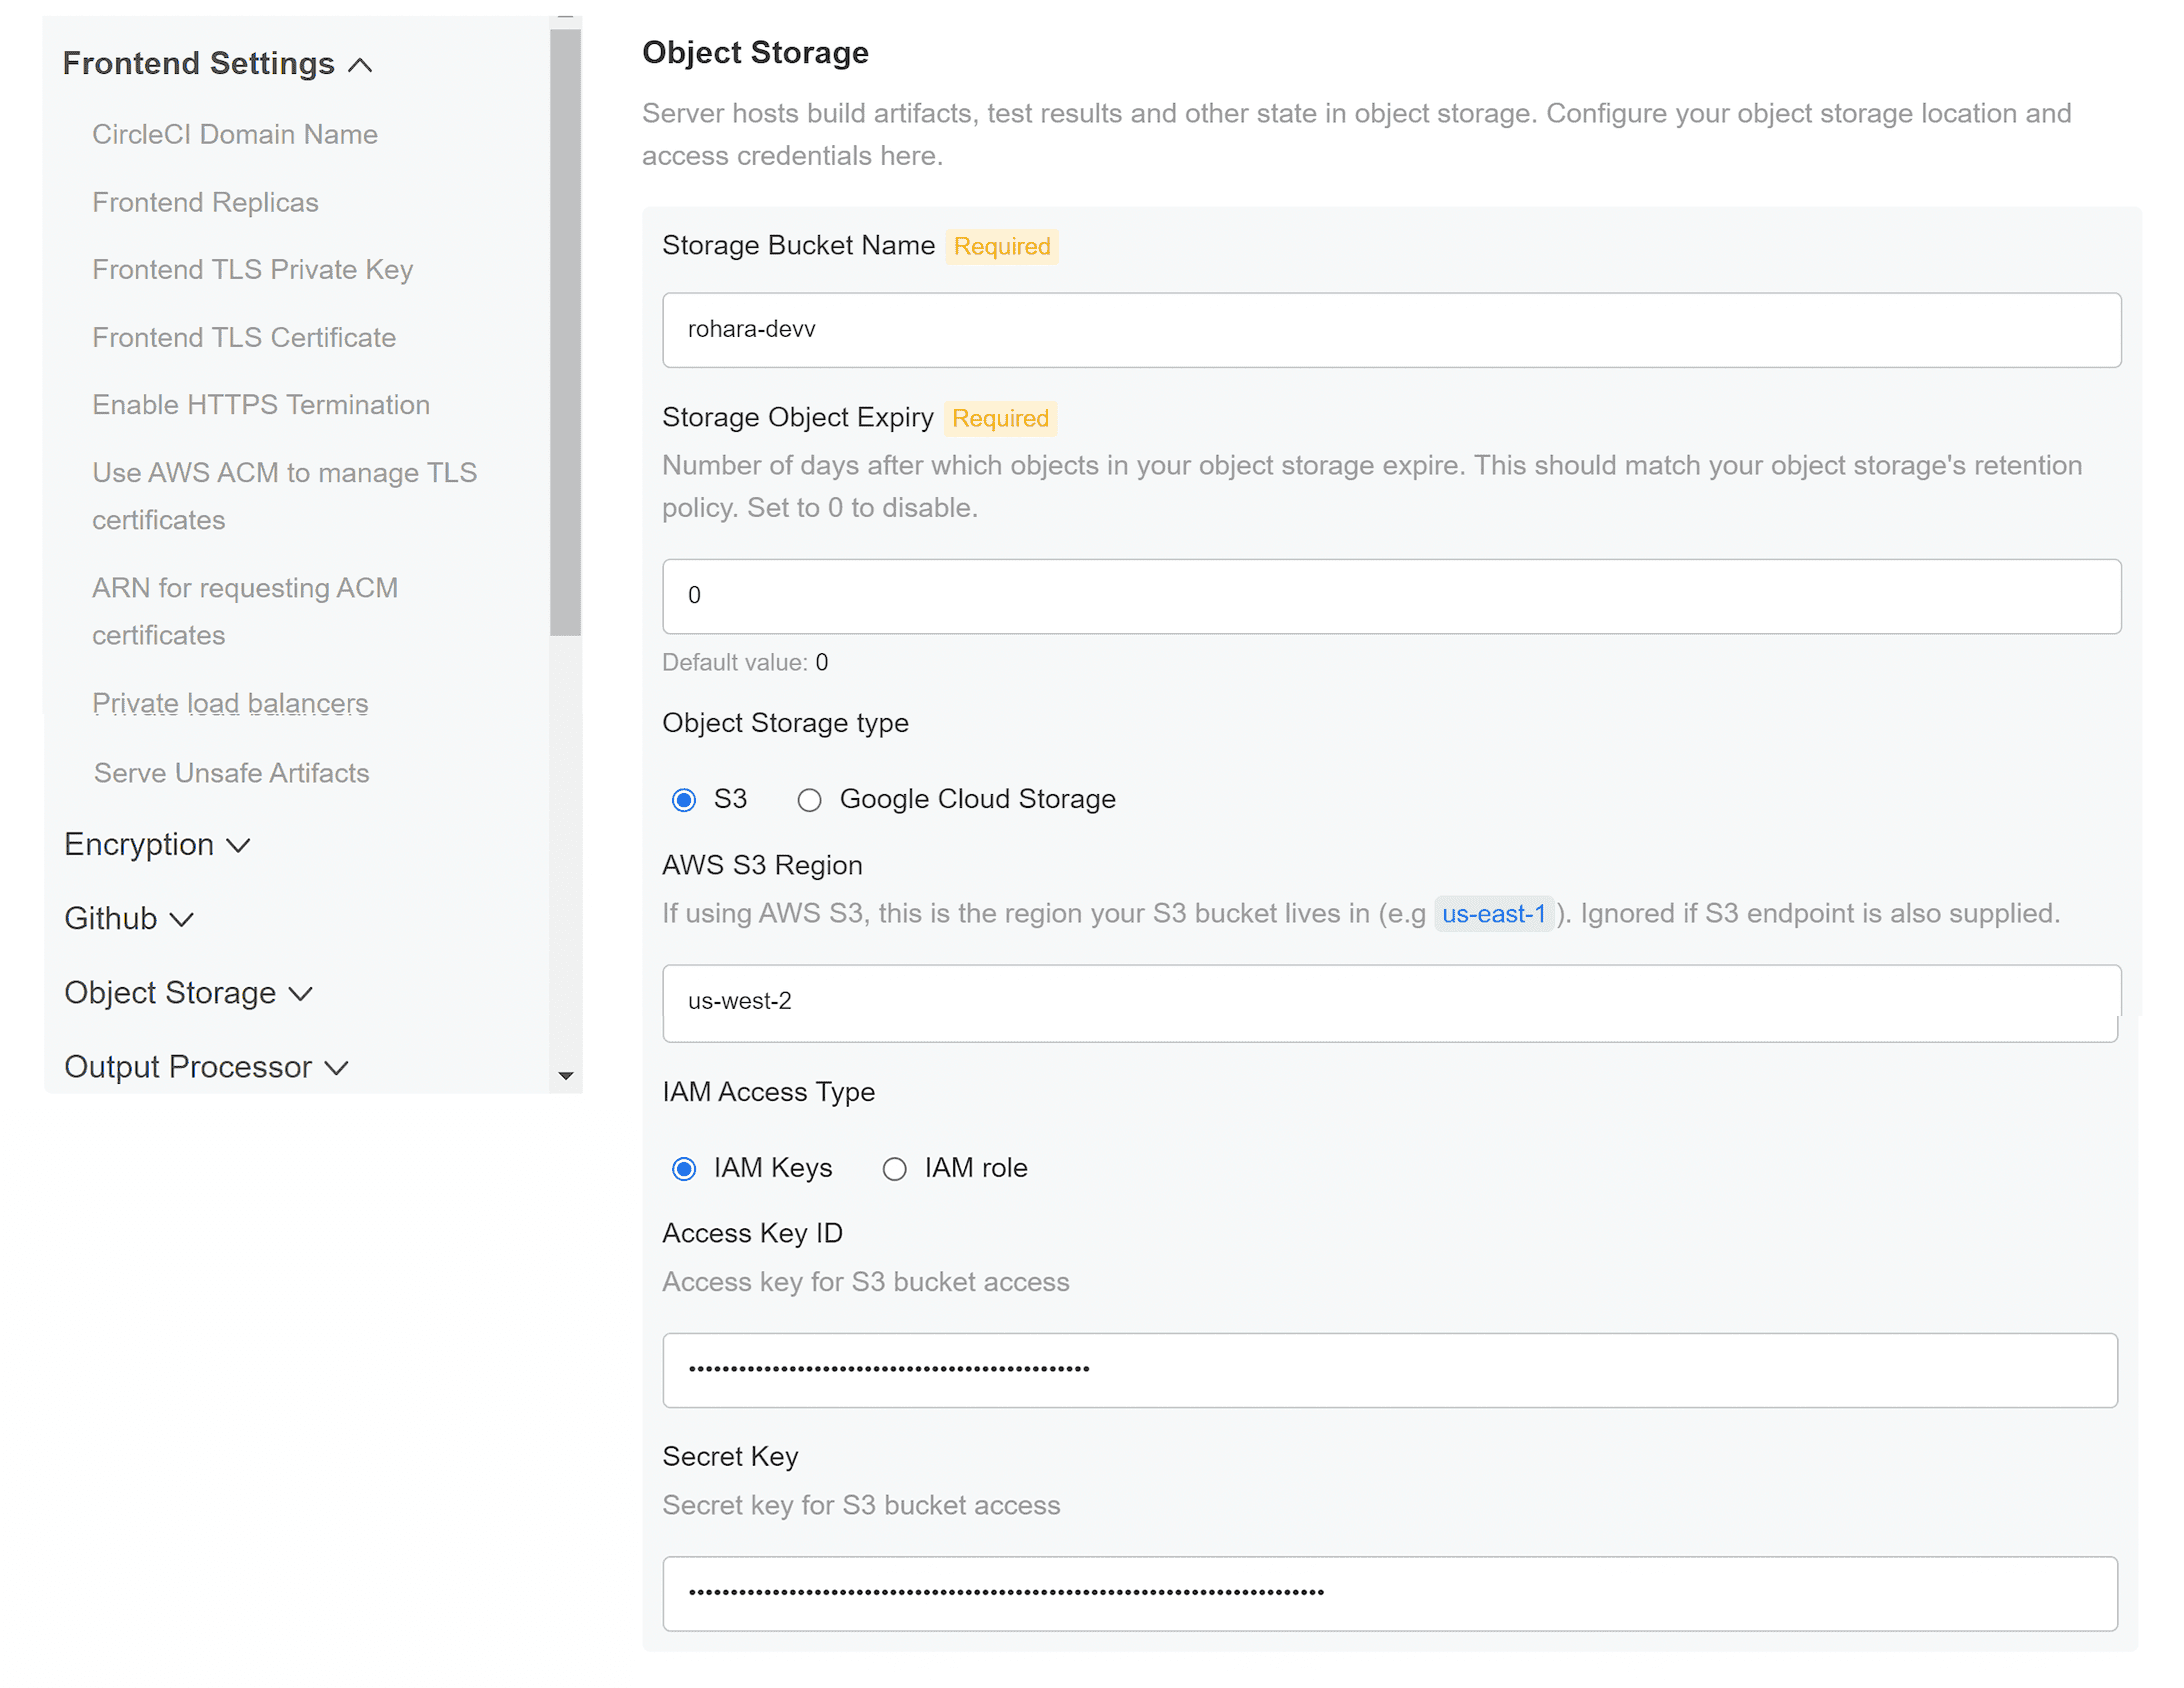
S3 compatible
-
Storage Bucket Name (required) - The bucket used for server.
-
AWS S3 Region (optional) - AWS region of bucket if your provider is AWS. S3 Endpoint is ignored if this option is set.
-
S3 Endpoint (optional) - API endpoint of S3 storage provider. Required if your provider is not AWS. AWS S3 Region is ignored if this option is set.
-
Storage Object Expiry (required) - Number of days to retain your test results and artifacts. Set to 0 to disable and retain objects indefinitely.
Authentication
One of the following is required. Either select IAM keys and provide:
-
Access Key ID (required) - Access Key ID for S3 bucket access.
-
Secret Key (required) - Secret Key for S3 bucket access.
-
policy.json(required) - As outlined in the server AWS Installation Guide, on page 11.
Or select IAM role and provide:
-
Role ARN (required) - Role ARN for Service Accounts (Amazon Resource Name) for S3 bucket access.
-
policy.json(required) - As outlined in the server AWS Installation Guide, on page 8.
Google Cloud Storage
You should have created your Google Cloud Storage bucket and service account during the prerequisite steps.
-
Storage Bucket Name (required) - The bucket used for server.
-
Storage Object Expiry (required) - Number of days to retain your test results and artifacts. Set to 0 to disable and retain objects indefinitely.
Authentication
-
You can choose one of the following:
-
Service Account JSON (required) - A JSON format key of the Service Account to use for bucket access.
-
Service Account Email (required) - Service Account Email id if using Google Workload Identity.
-
Postgres, MongoDB, Vault settings
You can skip these sections unless you plan on using an existing Postgres, MongoDB or Vault instance, in which case, see the Externalizing Services doc. By default, CircleCI server v3.x will create its own Postgres, MongoDB and Vault instances within the CircleCI namespace. The instances inside the CircleCI namespace will be included in the CircleCI backup and restore process.
Save and deploy
Once you have completed the fields detailed above, you can deploy. The deployment installs the core services and provides you with an IP address for the Kong load balancer. That IP address is critical in setting up a DNS record and completing the first phase of the installation.
Create DNS entry
Create a DNS entry for your Kong load balancer, for example, circleci.your.domain.com and app.circleci.your.domain.com. The DNS entry should align with the DNS names used when creating your TLS certificate and GitHub OAuth app during the prerequisites steps. All traffic will be routed through this DNS record.
You need the IP address or, if using AWS, the DNS name of the Kong load balancer. You can find this information with the following command:
kubectl get service circleci-server-traefik --namespace=<YOUR_CIRCLECI_NAMESPACE>For more information on adding a new DNS record, see the following documentation:
| The Kong load balancer has a healthcheck that serves a JSON payload at https://loadbalancer-address/status |
Validation
You should now be able to navigate to your CircleCI server installation and log in to the application successfully.
Now we will move on to build services. It may take a while for all your services to be up. You can periodically check by running the following command (you are looking for the “frontend” pod to show a status of running and ready should show 1/1):
kubectl get pods -n <YOUR_CIRCLECI_NAMESPACE>
What to read next
Help make this document better
This guide, as well as the rest of our docs, are open source and available on GitHub. We welcome your contributions.
- Suggest an edit to this page (please read the contributing guide first).
- To report a problem in the documentation, or to submit feedback and comments, please open an issue on GitHub.
- CircleCI is always seeking ways to improve your experience with our platform. If you would like to share feedback, please join our research community.
Need support?
Our support engineers are available to help with service issues, billing, or account related questions, and can help troubleshoot build configurations. Contact our support engineers by opening a ticket.
You can also visit our support site to find support articles, community forums, and training resources.

CircleCI Documentation by CircleCI is licensed under a Creative Commons Attribution-NonCommercial-ShareAlike 4.0 International License.


